How to Overclock your Graphics Card with MSI Afterburner
Graphics cards are used to render images on the screen. They are one of the essential parts of a computer. If you’re using an old graphics card and want to gain some extra performance, you can do it by Overclocking it. For Overclocking, we increase the Core Clock, Memory Clock, etc., which changes how fast your GPU runs. This simple guide will teach you everything you need to know about how to overclock your graphic card so that you can enjoy your games on high settings!
Latest gamers require a lot of graphics processing power in order to play smoothly. Modern video games are so detailed that they can take up a huge amount of computing power and memory, leading to lower frame rates than expected. Some gamers will choose to overclock their graphics card in order to enhance their gaming experience.
Here are some easy steps on how to overclock your graphics card with MSI Afterburner.
The tools you need for overclocking
Best Overclocking tool: There are many overclocking tools, but we use the MSI Afterburner primarily for GPU overclocking. Some people use other overclocking tools like Rivatuner, Nvidia Inspector, Asus GPU tweak, But I never used these. The MSI Afterburner always did the overclocking perfectly. The user interface of your downloaded MSI Afterburner can be different. But, the settings are the same. I have put a small guide on how to change the Afterburner interface at the end of the article.
Benchmarking tool: A benchmarking tool or Stress test tool will test your GPU performance. It will put your GPU on load So that you can determine whether your GPU is working perfectly under load or not. I prefer the Heaven benchmark and the FurMark (Stress tool) for checking benchmarks and testing GPU performance. We’ll use these tools to check Overclocking performance.
GPU-Z by Techpowerup: GPU-Z is a lightweight and excellent tool for checking the details of your graphics card. After Overclocking or Tweaking some settings, GPU-z will confirm that if the new settings have taken place or not.
Benchmark your GPU before overclocking
Before Overclocking, Benchmark your GPU so you can have an idea about its performance. You can record the performance before overclocking.
Use the Heaven Benchmark Tool or FurMark for testing, and check your current performance. It will also help you to determine the temperature and FPS before overclocking. So, that after overclocking, you can check temperature and performance for a better idea. Using the software is entirely safe. I personally use these tools for testing Graphics cards.
Let’s see how to overclock GPU with MSI afterburner
MSI Afterburner is a completely safe tool for overclocking. The temperature and PowerDraw don’t increase high after overclocking; only 1-2°C temperature and 5-7 Watt power may increase after overclocking (not every time); with many graphics cards, the temperature remains the same.
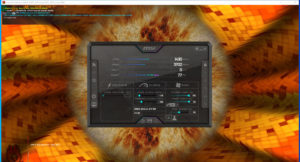
Step 1- Download MSI Afterburner
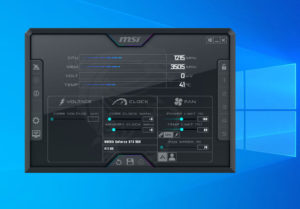
Download and open MSI Afterburner, It may look different in your system as it looks in the image above because it depends on the MSI Afterburner version that you’re running, or you can also change its appearance.
Step 2- Some settings before Overclocking
Click the settings button, and in the General section, Checkmark the Start with Windows and Start Minimized box. It means the MSI Afterburner will open in the background and will apply these overclocks settings for you, so you don’t have to do that every time you start your system. If you just want to temporarily overclock your GPU or check its overclocking potential, then you can ignore these settings.
Step 3- Increase Fan Speed
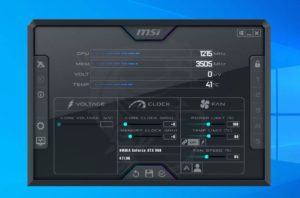
Increase your fan speed, and you can also overclock without doing that. But that’s my personal preference.
To do that, on the Fan speed slider, click on the Auto/(A) button that will unlock the slider. Set it anywhere from 50-100%, higher the percentage higher the fan noise, so if you are comfortable with a loud noise, then you can also set it to 100%, but I mostly set it between 60-70%. It will keep your GPU very cool even after Overclocking. After adjusting fan speed, click the checkmark /Apply button.
Step 4- Max Power Limit and Temp. Limit
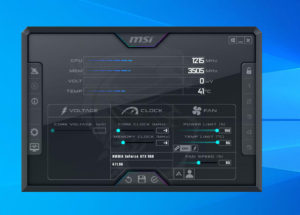
Now, Max the Power Limit (%) and Temp. Limit (°C). With that, the GPU will run more power-efficiently, and you’ll not feel any stuttering during power-intensive games. The Temps limit will not cause your GPU to reach 92°C; you’ll never get temperatures this high. Only 1-2°C may increase after overclocking. Apply those settings by clicking on the checkmark button.
Step 5- Turn on FurMark Stress test
Turn on the Furmark Stress test and stress test your GPU, check if it’s stable. And now we’ll start pushing the Core Clock (MHz) and Memory Clock until we notice any flickering, any graphical issue, or completely crashing of the display. If any of these things happen, then it means the GPU has reached the max overclocking potential, and then we’ll push a few settings down. It will not do any damage or anything to your GPU. Don’t worry if the display turn on or off or the app crashes.
Overclocking Boost Clock and Memory Clock
1- Click on the Core Clock and do an increment of 20, and hit the checkmark. Let the stress test run and check if it’s running fine. Keep doing an increment of 20 and keep checking the Furmark; push some Core Clock down if anything happens. For Example: if at +110 Core Clock, FurMark was running fine but crashed at +130. Keep it at +110, and that’s the Max Core Clock potential. You can also check by incrementing 5-10 MHz Core Clock.
2- Once you have found the Max Core Clock, start doing the same with the Memory Clock. The Memory Clock can be clocked higher than Core Clock, so keep on doing increment of 20 MHz. In my case, +200 Memory Clock works completely fine. Maybe for you, Furmurk will run perfectly at 250+ Memory Clock. But keep on checking because every graphics card has a different Overclocking potential.
3- If your system crashes, apply your last stable Clocks. Once you have found perfect settings, do a stress test for at least 5-10 mins. It will ensure that the GPU is stable after overclocking. Keep an eye on the stress test to see if you have any graphical issues, application crashes, glitches, artifacts, Black screen, etc.
4- If you notice any issue within 5-10 mins of stress test, deduct -10 MHz Core Clock or -20 MHz from your Memory Clock. Repeat until the issue goes away.
5- After everything is set perfectly, what you have to do is save these settings to a profile. Click on the profile one or two to save these settings. If you want to test some settings, you can also save those settings to other profiles.
Test Overclocking by Playing Games
Maybe during gaming, you may notice any issues or crashes. If it happens then push down some settings a little bit. There are rare chances that you’ll notice issues during gaming, but again if you observe any issue, push 10-15 Hz down.
How to change MSI Afterburner User Interface
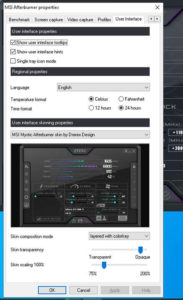
There are many cool user interfaces of MSI Afterburner. You can easily change it.
1- Turn On MSI Afterburner then click on the “settings” button.
2- On the top bar, click on the User Interface menu.
3- There you’ll see User Interface Skinning properties. You can select any user interface there. My favorite is the MSI Mystic Afterburner skin. After selecting, press Apply button and then OK button.
Conclusion
In this article, we have checked how to overclock our graphics card with MSI Afterburner. We have also checked how we can find our GPU max overclocking potential.
Overclocking is entirely safe if everything is done perfectly. Sometimes, I overclock my GPU to get 5-10% more FPS in games. My old GPU provided 54 FPS in COD: Warzone, but it provided 60+ FPS after overclocking. It depends on the games; in some games, you’ll notice a 5% FPS increase, or in some, you’ll see a 10%+ FPS boost.
Thanks for reading this article, Enjoy your Overclocked GPU!